


Photo by Loik Marras on Unsplash
What Happens When? K8s Edition
Okay, so; what happens when you do kubectl create deploy nginx --image=nginx --replicas=3


tl;dr If all went well, you should see three nginx pods running on your cluster
But, what is going on under the hood
The Beginning
A really good thing about K8s is that it hides its complexities by providing simple abstractions and user-friendly APIs. I think that to fully understand the values it offers, it's good to know a bit about its internals. In this post, I'll trace the path a K8s deployment object takes from the time we enter kubectl create deploy nginx --image=nginx --replicas=3 to when we finally see the three running nginx pods.
k8s API
The Kubernetes API is an HTTP REST API. This API is the real Kubernetes user interface. Kubernetes is fully controlled through this API. This means that every Kubernetes operation is exposed as an API endpoint and can be executed by an HTTP request to this endpoint.
Kubernetes is a fully resource-centered system. That means, Kubernetes maintains an internal state of resources, and all Kubernetes operations are CRUD operations on these resources. Kubernetes is controlled by manipulating these resources (and Kubernetes figures out what to do based on the current state of resources).
The kubeconfig file
K8s api-server talks HTTP(S) and exposes some REST endpoints. The kubeconfig file in your directory contains information about your clusters' endpoints, users' auth info, and a map of clusters and users. Almost all k8s related components/clients make use of this file to connect to the cluster. Default kubeconfig file resides in users home dir at ~/.kube/config
The kubectl
We entered
kubectl create deploy nginx --image=nginx --replicas=3
Now, what?
While the server-side validation is favored and is de-facto. The first thing that kubectl will do is perform some trivial client-side validations. This ensures that the requests that should always fail (like invalid spec key, wrong indentation, etc) will fail fast without unnecessary server load.
At this point kubectl will serialize the request and start forming the HTTP request it will send to kube-apiserver.
client-auth
User creds are almost always stored in the kubeconfig file. To locate the config file, kubectl does the following
If a
--kubeconfigflag is provided, use thatIf the
KUBECONFIGenv var is set, use thatotherwise, look at the default (
~/.kube/config) location
After parsing the file, it then determines the current context to use, the current cluster to point to, and any auth information associated with the current user.
API groups and version negotiation
K8s uses a versioned API that is categorized into "API groups". An API group is meant to categorize similar resources so that they're easier to reason about. It also provides a better alternative to a singular monolithic API. The API group of a Deployment is named apps, and its most recent version is v1
After kubectl generates the object, it starts to find the appropriate API group and version for it. This discovery stage is called version negotiation and involves kubectl scanning the /apis path on the remote API to retrieve all possible API groups. Since kube-apiserver exposes its schema document (in OpenAPI format) at this path, it's easy for clients to perform their own discovery. kubectl caches the discovery result at ~/.kube/cache location.
After the API Group and version discovery, kubectl will validate if the resource we are going to create is actually supported by the server. And then it'll POST to the appropriate API. Generally the API path will be /apis/<api-group>/<api-version>/namespaces/<namespace>/<kind>
So, in our case request will be sent to /apis/apps/v1/namespaces/default/deployments with POST data being the object data. You can check this with kubectl's -v flag
kubectl create deploy nginx --image=nginx --replicas=2 -v=8
I0203 12:34:48.915446   25098 loader.go:379] Config loaded from file:  /Users/xxxxxxx/.kube/config
I0203 12:34:48.916475   25098 cert_rotation.go:137] Starting client certificate rotation controller
I0203 12:34:48.918611   25098 request.go:1107] Request Body: {"kind":"Deployment","apiVersion":"apps/v1","metadata":{"name":"nginx","creationTimestamp":null,"labels":{"app":"nginx"}},"spec":{"replicas":2,"selector":{"matchLabels":{"app":"nginx"}},"template":{"metadata":{"creationTimestamp":null,"labels":{"app":"nginx"}},"spec":{"containers":[{"name":"nginx","image":"nginx","resources":{}}]}},"strategy":{}},"status":{}}
I0203 12:34:48.918676   25098 round_trippers.go:422] POST https://192.168.64.3:8443/apis/apps/v1/namespaces/default/deployments?fieldManager=kubectl-create
I0203 12:34:48.918682   25098 round_trippers.go:429] Request Headers:
I0203 12:34:48.918686   25098 round_trippers.go:433]     Accept: application/json, */*
I0203 12:34:48.918690   25098 round_trippers.go:433]     Content-Type: application/json
I0203 12:34:48.918694   25098 round_trippers.go:433]     User-Agent: kubectl/v1.20.6 (darwin/amd64) kubernetes/8a62859
I0203 12:34:48.933429   25098 round_trippers.go:448] Response Status: 201 Created in 14 milliseconds
I0203 12:34:48.933466   25098 round_trippers.go:451] Response Headers:
I0203 12:34:48.933470   25098 round_trippers.go:454]     Content-Type: application/json
I0203 12:34:48.933474   25098 round_trippers.go:454]     X-Kubernetes-Pf-Flowschema-Uid: c504618b-a382-437b-9bef-25ad5118629f
I0203 12:34:48.933479   25098 round_trippers.go:454]     X-Kubernetes-Pf-Prioritylevel-Uid: 3d1e0523-1c81-495b-885f-7056ed97da3d
I0203 12:34:48.933482   25098 round_trippers.go:454]     Content-Length: 1645
I0203 12:34:48.933485   25098 round_trippers.go:454]     Date: Thu, 03 Feb 2022 03:34:49 GMT
I0203 12:34:48.933488   25098 round_trippers.go:454]     Cache-Control: no-cache, private
I0203 12:34:48.933521   25098 request.go:1107] Response Body: {"kind":"Deployment","apiVersion":"apps/v1","metadata":{"name":"nginx","namespace":"default","uid":"ecddc09b-f322-4a04-8332-aa00484867c0","resourceVersion":"641059","generation":1,"creationTimestamp":"2022-02-03T03:34:49Z","labels":{"app":"nginx"},"managedFields":[{"manager":"kubectl-create","operation":"Update","apiVersion":"apps/v1","time":"2022-02-03T03:34:49Z","fieldsType":"FieldsV1","fieldsV1":{"f:metadata":{"f:labels":{".":{},"f:app":{}}},"f:spec":{"f:progressDeadlineSeconds":{},"f:replicas":{},"f:revisionHistoryLimit":{},"f:selector":{},"f:strategy":{"f:rollingUpdate":{".":{},"f:maxSurge":{},"f:maxUnavailable":{}},"f:type":{}},"f:template":{"f:metadata":{"f:labels":{".":{},"f:app":{}}},"f:spec":{"f:containers":{"k:{\"name\":\"nginx\"}":{".":{},"f:image":{},"f:imagePullPolicy":{},"f:name":{},"f:resources":{},"f:terminationMessagePath":{},"f:terminationMessagePolicy":{}}},"f:dnsPolicy":{},"f:restartPolicy":{},"f:schedulerName":{},"f:securityContext":{},"f:terminationGracePeriodSeconds":{}}}}}}]},"spec":{ [truncated 621 chars]
deployment.apps/nginx created
The API-Server
So our request has been sent, woaah! What now? We have already talked about the kube-apiserver briefly but this is where it takes the central stage.
Authentication
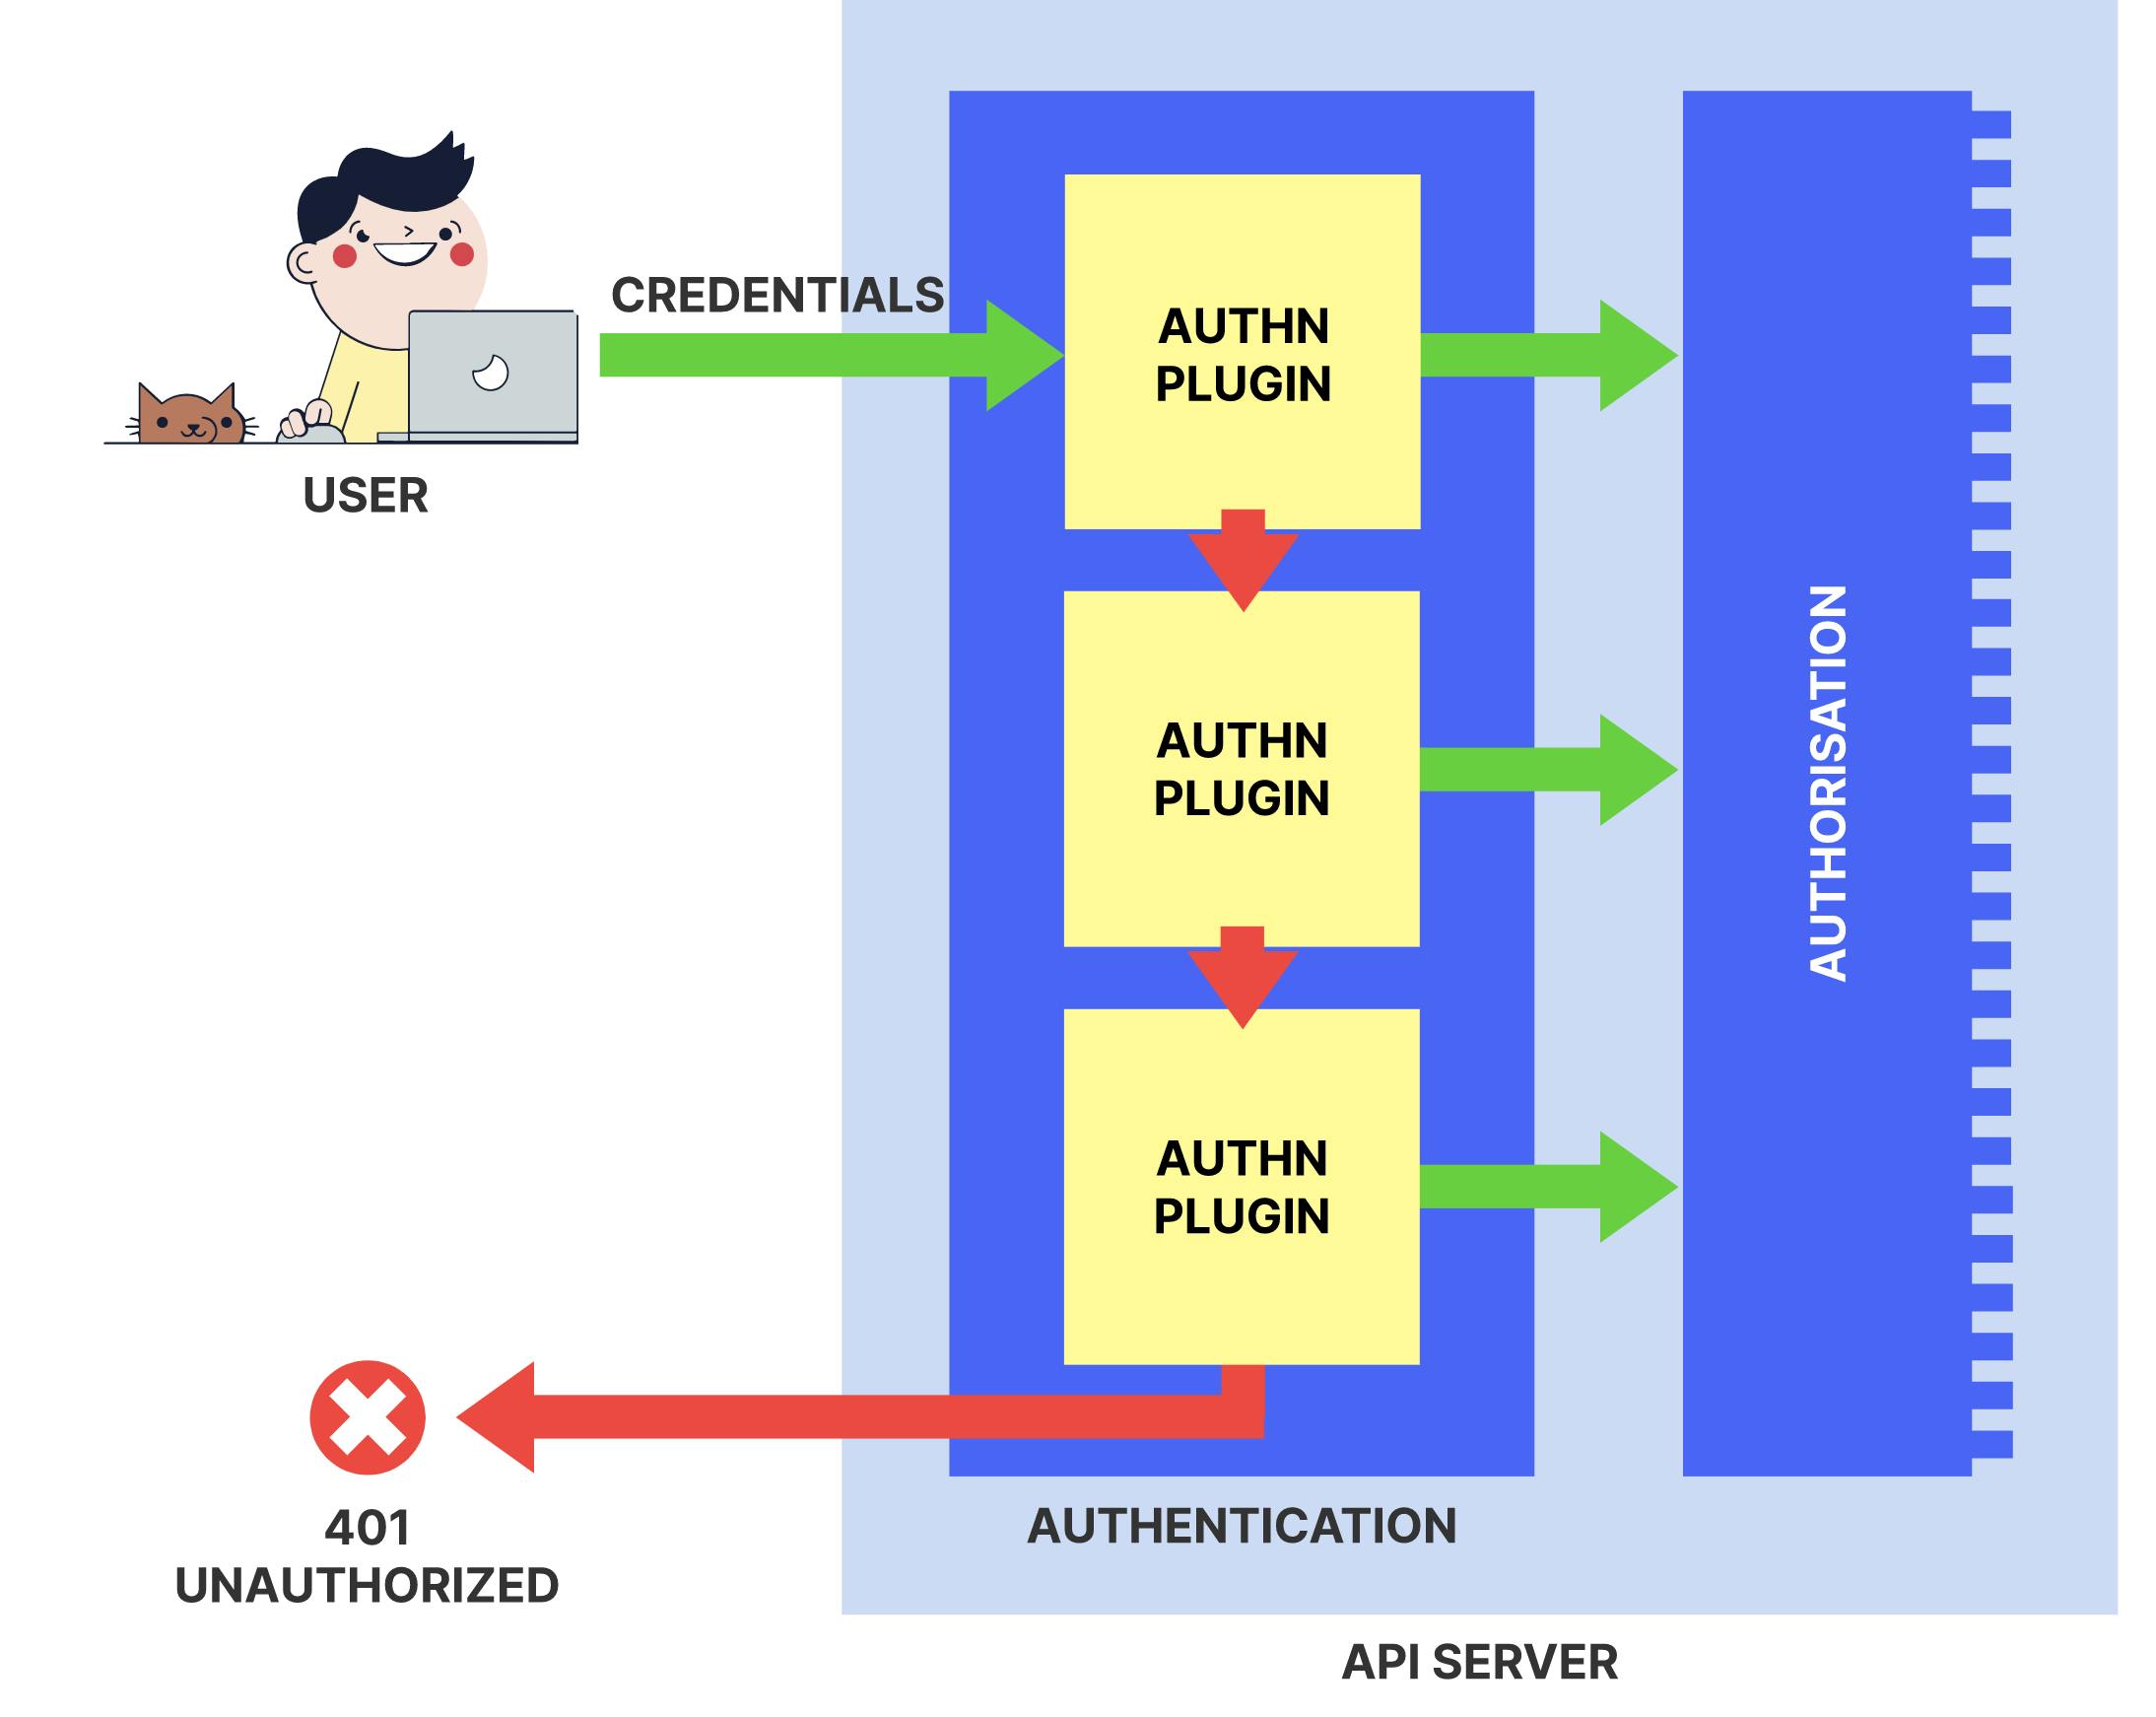
All K8s clusters have two categories of users: service accounts (managed by K8s) and normal users. For normal users, when the apiserver starts up, it looks at all the CLI flags the user-provided and assembles a list of suitable authenticators. For example, if a --client-ca-file has been passed in, it appends the x509 authenticator; if it sees --token-auth-file provided, it appends the token authenticator to the list. Additionally webhook-token-authentication, authenticating-proxy can be used for custom authenticator plugins.
As HTTP requests are made to the API server, plugins attempt to associate the following attributes with the request:
Username: a string that identifies the end-user. Common values might be kube-admin or jane@example.com.
UID: a string that identifies the end-user and attempts to be more consistent and unique than username.
Groups: a set of strings, each of which indicates the user's membership in a named logical collection of users. Common values might be
system:mastersordevops-team.
All values are opaque to the authentication system and only hold significance when interpreted by an authorizer.
You can enable multiple authentication methods at once. You should usually use at least two methods:
service account tokens for service accounts
at least one other method for normal user authentication.
When multiple authenticator modules are enabled, the first module to successfully authenticate the request short-circuits evaluation. The API server does not guarantee the order authenticators run in.
Let's talk about a couple of authenticators next
X509 Client Certs
Client certificate authentication is enabled by passing the --client-ca-file=SOMEFILE option to API server. If a client certificate is presented and verified against above CA, the common name(CN) of the subject is used as the user name for the request. As of Kubernetes 1.4, client certificates can also indicate a user's group memberships using the certificate's organization(O) fields.
For example, following request would create a CSR for the username "nakam", belonging to two groups, "devops" and "devs".
openssl req -new -key key.pem -out csr.pem -subj "/CN=nakam/O=devops/O=devs"
Static Token File
The API server reads bearer tokens from a file when given the --token-auth-file=SOMEFILE option on the command line. Currently, tokens last indefinitely, and the token list cannot be changed without restarting the API server.
The token file is a csv file with a minimum of 3 columns: token, user name, user uid, followed by optional group names.
When authenticating from an http client, the API server expects an Authorization header with a value of Bearer <TOKEN>.
Authorization: Bearer 31ada4fd-adec-460c-809a-9e56ceb75269
Service Account Tokens
A service account is an automatically enabled authenticator that uses signed bearer tokens to verify requests. The plugin takes two optional flags:
--service-account-key-fileA file containing a PEM encoded key for signing bearer tokens. If unspecified, the API server's TLS private key will be used.--service-account-lookupIf enabled, tokens which are deleted from the API will be revoked. Service accounts are usually created automatically by the API server and associated with pods running in the cluster through the ServiceAccount Admission Controller. Bearer tokens are mounted into pods at well-known locations but are perfectly valid to use outside the cluster and can be used to create identities for long standing jobs that wish to talk to the Kubernetes API.
Service accounts authenticate with the username system:serviceaccount:(NAMESPACE):(SERVICEACCOUNT), and are assigned to the groups system:serviceaccounts and system:serviceaccounts:(NAMESPACE).
➜ kubectl get sa default -oyaml
apiVersion: v1
kind: ServiceAccount
metadata:
  creationTimestamp: "2021-12-10T11:19:21Z"
  name: default
  namespace: default
secrets:
- name: default-token-w8dkr

➜ kubectl get secret default-token-w8dkr -oyaml
apiVersion: v1
data:
  ca.crt: LS0tLS1CRUdJTiBDRVJUSUZJQ0FURS0tLS0tCk1JSURCakNDQWU2Z0F3SUJBZ0lCQVRBTkJna3Foa2lHOXcwQkFRc0ZBREFWTVJNd0VRWURWUVFERXdwdGFXNXAKYTNWaVpVTkJNQjRYRFRJeE1USXdOakF4TURreU4xb1hEVE14TVRJd05UQXhNRGt5TjFvd0ZURVRNQkVHQTFVRQpBeE1LYldsdWFXdDFZbVZEUVRDQ0FTSXdEUVlKS29aSWh2Y05BUUVCQlFBRGdnRVBBRENDQVFvQ2dnRUJBTTlOCjQzbnV0dmJucXdkVlNEOWFsSmJJZWdacHdoOERGT2JDL2RUYjY0eGpzUHAxQklpenFJTnVvNnJLaXF3RDZDdkgKT1psMzhnNWNjcmtCVEw1OUhDa0JBdTh4U1I5VTczdG0weWZHeDdJQWp6a09BcDQ2Z1dGSjBodDJTOE85ZU9yYgo3aGIvTGUvVUl5NVErWm82ellNWUE3K0NmQUNxZm0rd0syVVJYUzVndjkrc1k0cFJGYWp4NFJWV05NTnpKdDExCllHdFQvYWV3WFVhRk9iSWxraUlEWHVNbVFLVGRyVlAvZktrNDhEM21JOGFiUlBYU2RvRU1PNnR0Mkl3Y01XaXIKZVR0OHdWdlVUSkdsa0dRL2ZTQm5EUFpzMElOREZoenl6MkJvK1pLVU1sK1FvR1VtdmFpTmJyUjBQRWlYOGNxQQpPQmZMcHZHc2U4VTZWcXVIeHUwQ0F3RUFBYU5oTUY4d0RnWURWUjBQQVFIL0JBUURBZ0trTUIwR0ExVWRKUVFXCk1CUUdDQ3NHQVFVRkJ3TUNCZ2dyQmdFRkJRY0RBVEFQQmdOVkhSTUJBZjhFQlRBREFRSC9NQjBHQTFVZERnUVcKQkJUVU80U0dla243Uld6WTB1VDdMc2NBaGpoWjd6QU5CZ2txaGtpRzl3MEJBUXNGQUFPQ0FRRUFHeExoRjFDYwplQXp2ZG9kQ1RKKzdJNk91M2Ira1h4Nkx6Q2VtMGJkMXRIQUhvWTdiaWhxaHRlalQ4STFheDNNNm55RG1zdk00Ckd0MUtQT3BJRm01ZHU1emt3RXZrZE4vbFFJWTBoK1h4TERySUc0S21aYmZyQWRtWVlZWHo5M3dsbitVdm9LZkYKeEFuTU8xY1F4OWlHRTVFeGhScm9xb0J1dFJIemVSMFczTjB6VFczaGpVZEp3RTA2andEYlV0QUNHS0FkQURtRgpia1NRYXFud0pIY3lNckhnL2JOTTN0K3k4S2dQL1Rtd1o1aXVPVWJjT1g3WjBuSXVmWlU2T3hLSEpINkJTR2w0CnJUMzFsZXYwc3RSSklRTVcwZXYrTENOZXpYZ2VlUDZNOTc1Z0h4QldSZEY1K25yVzczNmVUbGVWcWI0S2JWcGEKRWltMmFuT0N5MnhxOEE9PQotLS0tLUVORCBDRVJUSUZJQ0FURS0tLS0tCg==
  namespace: ZGVmYXVsdA==
  token: ZXlKaGJHY2lPaUpTVXpJMU5pSXNJbXRwWkNJNklrOUJhRWd0V0hoeVZESktXSHAxVlRKbmMwTTJabk01Vmt0eFRrdHZOalJwZFV0cVMwdDZiekpvYVRnaWZRLmV5SnBjM01pT2lKcmRXSmxjbTVsZEdWekwzTmxjblpwWTJWaFkyTnZkVzUwSWl3aWEzVmlaWEp1WlhSbGN5NXBieTl6WlhKMmFXTmxZV05qYjNWdWRDOXVZVzFsYzNCaFkyVWlPaUprWldaaGRXeDBJaXdpYTNWaVpYSnVaWFJsY3k1cGJ5OXpaWEoyYVdObFlXTmpiM1Z1ZEM5elpXTnlaWFF1Ym1GdFpTSTZJbVJsWm1GMWJIUXRkRzlyWlc0dGR6aGthM0lpTENKcmRXSmxjbTVsZEdWekxtbHZMM05sY25acFkyVmhZMk52ZFc1MEwzTmxjblpwWTJVdFlXTmpiM1Z1ZEM1dVlXMWxJam9pWkdWbVlYVnNkQ0lzSW10MVltVnlibVYwWlhNdWFXOHZjMlZ5ZG1salpXRmpZMjkxYm5RdmMyVnlkbWxqWlMxaFkyTnZkVzUwTG5WcFpDSTZJamc1T1dZd1lUaG1MVFUxTXpjdE5EbG1OeTA1TW1KaExUYzJZMlZpTmpFM09ETmtOaUlzSW5OMVlpSTZJbk41YzNSbGJUcHpaWEoyYVdObFlXTmpiM1Z1ZERwa1pXWmhkV3gwT21SbFptRjFiSFFpZlEuR0cyaWFwTV9IQlNOQTE2Vm5fNTN5NFRER1o0NUltUHBYYzVfUlV3OEJKbUxpZ3VSN004X1NhM1A3YUZnQnIzT19uZk1rWDZqcFkxNXBzRlpuVU1XS0JJZy1KRVJTb21NbGJhZk0zdFZTekZYWVVza1FQYWtPb1FIOWV1V2JuV3k5Q1RROW5hQnd5YWRJSldfa1ZYS0piNFJaZVdnMnpveElIamI3VFVMQk9QUzY2aGZwU3Y3N3IzREh0T1RMeXEyVlpOSlpDdXJYT1hZTExaQ1VtUWtLdUtETUZ5TG91NzJFQ2Q1WkVsZmY5Zk0tZ2plWjd6LWhiWEhJVG9DcVFqb2JaNWM2dzYwSnVBMHR2TkxwMjgxUm14WlhmTzVjMG5WSEdyYS1hY2k3SGZ4X2d1anBLcWRUZHVENnRvQ3FXSFF1T25WYkRCdEtHSllZZjNWOW94OHFB
kind: Secret
metadata:
  annotations:
    kubernetes.io/service-account.name: default
    manager: kube-controller-manager
    operation: Update
    time: "2021-12-10T11:19:21Z"
  name: default-token-w8dkr
  namespace: default
  resourceVersion: "410"
  uid: 3d7ac7b4-633e-4591-8c34-8d5d0f84470f
type: kubernetes.io/service-account-token

➜ TOKEN="ZXlKaGJHY2lPaUpTVXpJMU5pSXNJbXRwWkNJNklrOUJhRWd0V0hoeVZESktXSHAxVlRKbmMwTTJabk01Vmt0eFRrdHZOalJwZFV0cVMwdDZiekpvYVRnaWZRLmV5SnBjM01pT2lKcmRXSmxjbTVsZEdWekwzTmxjblpwWTJWaFkyTnZkVzUwSWl3aWEzVmlaWEp1WlhSbGN5NXBieTl6WlhKMmFXTmxZV05qYjNWdWRDOXVZVzFsYzNCaFkyVWlPaUprWldaaGRXeDBJaXdpYTNWaVpYSnVaWFJsY3k1cGJ5OXpaWEoyYVdObFlXTmpiM1Z1ZEM5elpXTnlaWFF1Ym1GdFpTSTZJbVJsWm1GMWJIUXRkRzlyWlc0dGR6aGthM0lpTENKcmRXSmxjbTVsZEdWekxtbHZMM05sY25acFkyVmhZMk52ZFc1MEwzTmxjblpwWTJVdFlXTmpiM1Z1ZEM1dVlXMWxJam9pWkdWbVlYVnNkQ0lzSW10MVltVnlibVYwWlhNdWFXOHZjMlZ5ZG1salpXRmpZMjkxYm5RdmMyVnlkbWxqWlMxaFkyTnZkVzUwTG5WcFpDSTZJamc1T1dZd1lUaG1MVFUxTXpjdE5EbG1OeTA1TW1KaExUYzJZMlZpTmpFM09ETmtOaUlzSW5OMVlpSTZJbk41YzNSbGJUcHpaWEoyYVdObFlXTmpiM1Z1ZERwa1pXWmhkV3gwT21SbFptRjFiSFFpZlEuR0cyaWFwTV9IQlNOQTE2Vm5fNTN5NFRER1o0NUltUHBYYzVfUlV3OEJKbUxpZ3VSN004X1NhM1A3YUZnQnIzT19uZk1rWDZqcFkxNXBzRlpuVU1XS0JJZy1KRVJTb21NbGJhZk0zdFZTekZYWVVza1FQYWtPb1FIOWV1V2JuV3k5Q1RROW5hQnd5YWRJSldfa1ZYS0piNFJaZVdnMnpveElIamI3VFVMQk9QUzY2aGZwU3Y3N3IzREh0T1RMeXEyVlpOSlpDdXJYT1hZTExaQ1VtUWtLdUtETUZ5TG91NzJFQ2Q1WkVsZmY5Zk0tZ2plWjd6LWhiWEhJVG9DcVFqb2JaNWM2dzYwSnVBMHR2TkxwMjgxUm14WlhmTzVjMG5WSEdyYS1hY2k3SGZ4X2d1anBLcWRUZHVENnRvQ3FXSFF1T25WYkRCdEtHSllZZjNWOW94OHFB"

➜ echo -n $TOKEN | base64 -d
eyJhbGciOiJSUzI1NiIsImtpZCI6Ik9BaEgtWHhyVDJKWHp1VTJnc0M2ZnM5VktxTktvNjRpdUtqS0t6bzJoaTgifQ.eyJpc3MiOiJrdWJlcm5ldGVzL3NlcnZpY2VhY2NvdW50Iiwia3ViZXJuZXRlcy5pby9zZXJ2aWNlYWNjb3VudC9uYW1lc3BhY2UiOiJkZWZhdWx0Iiwia3ViZXJuZXRlcy5pby9zZXJ2aWNlYWNjb3VudC9zZWNyZXQubmFtZSI6ImRlZmF1bHQtdG9rZW4tdzhka3IiLCJrdWJlcm5ldGVzLmlvL3NlcnZpY2VhY2NvdW50L3NlcnZpY2UtYWNjb3VudC5uYW1lIjoiZGVmYXVsdCIsImt1YmVybmV0ZXMuaW8vc2VydmljZWFjY291bnQvc2VydmljZS1hY2NvdW50LnVpZCI6Ijg5OWYwYThmLTU1MzctNDlmNy05MmJhLTc2Y2ViNjE3ODNkNiIsInN1YiI6InN5c3RlbTpzZXJ2aWNlYWNjb3VudDpkZWZhdWx0OmRlZmF1bHQifQ.GG2iapM_HBSNA16Vn_53y4TDGZ45ImPpXc5_RUw8BJmLiguR7M8_Sa3P7aFgBr3O_nfMkX6jpY15psFZnUMWKBIg-JERSomMlbafM3tVSzFXYUskQPakOoQH9euWbnWy9CTQ9naBwyadIJW_kVXKJb4RZeWg2zoxIHjb7TULBOPS66hfpSv77r3DHtOTLyq2VZNJZCurXOXYLLZCUmQkKuKDMFyLou72ECd5ZElff9fM-gjeZ7z-hbXHIToCqQjobZ5c6w60JuA0tvNLp281RmxZXfO5c0nVHGra-aci7Hfx_gujpKqdTduD6toCqWHQuOnVbDBtKGJYYf3V9ox8qA

➜ echo -n "eyJhbGciOiJSUzI1NiIsImtpZCI6Ik9BaEgtWHhyVDJKWHp1VTJnc0M2ZnM5VktxTktvNjRpdUtqS0t6bzJoaTgifQ" | base64 -d
{"alg":"RS256","kid":"OAhH-XxrT2JXzuU2gsC6fs9VKqNKo64iuKjKKzo2hi8"

➜ echo -n "eyJpc3MiOiJrdWJlcm5ldGVzL3NlcnZpY2VhY2NvdW50Iiwia3ViZXJuZXRlcy5pby9zZXJ2aWNlYWNjb3VudC9uYW1lc3BhY2UiOiJkZWZhdWx0Iiwia3ViZXJuZXRlcy5pby9zZXJ2aWNlYWNjb3VudC9zZWNyZXQubmFtZSI6ImRlZmF1bHQtdG9rZW4tdzhka3IiLCJrdWJlcm5ldGVzLmlvL3NlcnZpY2VhY2NvdW50L3NlcnZpY2UtYWNjb3VudC5uYW1lIjoiZGVmYXVsdCIsImt1YmVybmV0ZXMuaW8vc2VydmljZWFjY291bnQvc2VydmljZS1hY2NvdW50LnVpZCI6Ijg5OWYwYThmLTU1MzctNDlmNy05MmJhLTc2Y2ViNjE3ODNkNiIsInN1YiI6InN5c3RlbTpzZXJ2aWNlYWNjb3VudDpkZWZhdWx0OmRlZmF1bHQifQ" | base64 -d
{"iss":"kubernetes/serviceaccount","kubernetes.io/serviceaccount/namespace":"default","kubernetes.io/serviceaccount/secret.name":"default-token-w8dkr","kubernetes.io/serviceaccount/service-account.name":"default","kubernetes.io/serviceaccount/service-account.uid":"899f0a8f-5537-49f7-92ba-76ceb61783d6","sub":"system:serviceaccount:default:default"
Authenticating Proxy
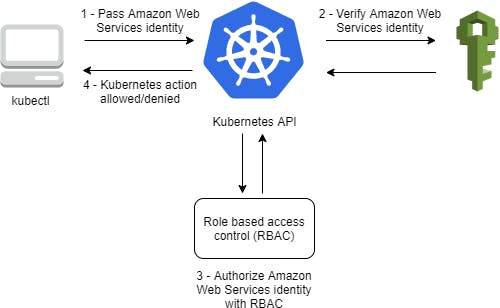
Custom authenticator plugins can be specified as Webhooks. This is how AWS IAM users are authenticated to EKS clusters using aws-iam-authenticator, the authenticator gets its configuration information from the aws-auth ConfigMap in kube-system namespace.
Once the authentication is done, the authenticator can send extra information to the api-server to set the client identity. The API server can be configured to identify users from request header values, such as X-Remote-User. An authenticating proxy, can set the request header value.
--requestheader-username-headersRequired, case-insensitive. Header names to check, in order, for the user identity. The first header containing a value is used as the username.--requestheader-group-headers1.6+. Optional, case-insensitive. "X-Remote-Group" is suggested. Header names to check, in order, for the user's groups. All values in all specified headers are used as group names.
For example, with this configuration:
--requestheader-username-headers=X-Remote-User
--requestheader-group-headers=X-Remote-Group
this request:
GET / HTTP/1.1
X-Remote-User: fido
X-Remote-Group: dogs
X-Remote-Group: dachshunds
would result in this user info:
name: fido
groups:
- dogs
- dachshunds
In order to prevent header spoofing, the authenticating proxy is required to present a valid client certificate to the API server for validation against the specified CA before the request headers are checked.
--requestheader-client-ca-fileRequired. PEM-encoded certificate bundle. A valid client certificate must be presented and validated against the certificate authorities in the specified file before the request headers are checked for user names.--requestheader-allowed-namesOptional. List of Common Name values (CNs). If set, a valid client certificate with a CN in the specified list must be presented before the request headers are checked for user names. If empty, any CN is allowed.
If every authenticator fails, the request fails and an error is returned. If authentication succeeds, the Authorization header is removed from the request, and user information is added to its context. This gives future steps (such as authorization and admission controllers) the ability to access the previously established identity of the user.
Authorization
Okay, so. Request has been sent and we have successfully defended to kube-apiserver that we are who we say we are, what a relief 😌 !!
But we might not have permissions to do what we might want to do (after all, identity and permissions are not the same thing).
The kube-apiserver handles authorization the same way it did authentication: based on flag inputs, it will assemble a chain of authorizers that will be run against every incoming request. When multiple authorization modules are configured, each is checked in sequence. If any authorizer approves or denies a request, that decision is immediately returned and no other authorizer is consulted. If all modules have no opinion on the request, then the request is denied. A deny returns an HTTP status code 403.
Request Attributes
Kubernetes reviews only the following API request attributes:
user - The user string provided during authentication.
group - The list of group names to which the authenticated user belongs.
extra - A map of arbitrary string keys to string values, provided by the authentication layer.
API - Indicates whether the request is for an API resource.
Request path - Path to miscellaneous non-resource endpoints like
/apior/healthz.API request verb - API verbs like
get,list,create,update,patch,watch,delete, anddeletecollectionare used for resource requests.HTTP request verb - Lowercased HTTP methods like
get,post,put, anddeleteare used for non-resource (requests to endpoints other than/api/v1/...or/apis/<group>/<version>/...are considered "non-resource requests") requests.Resource - The ID or name of the resource that is being accessed (for resource requests only)
Subresource - The subresource that is being accessed (for resource requests only).
Namespace - The namespace of the object that is being accessed (for namespaced resource requests only).
API group - The API Group being accessed (for resource requests only). An empty string designates the core API group.
Authorization Modes
The Kubernetes API server may authorize a request using one of several authorization modes:
Node
A special-purpose authorization mode that grants permissions to kubelets based on the pods they are scheduled to run.
RBAC
Role-based access control (RBAC) is a method of regulating access to computer or network resources based on the roles of individual users within an enterprise. In this context, access is the ability of an individual user to perform a specific task, such as view, create, or modify a file.
When specified, RBAC (Role-Based Access Control) uses the rbac.authorization.k8s.io API group to drive authorization decisions, allowing admins to dynamically configure permission policies through the Kubernetes API. To enable RBAC, start the apiserver with --authorization-mode=RBAC.
Webhook
A WebHook is an HTTP callback: an HTTP POST that occurs when something happens.
Check API Access
You can check if you are authorised to perform an action using kubectl's auth can-i subcommand. The command uses the SelfSubjectAccessReview API in authorization.k8s.io group to determine if the current user can perform a given action, and works regardless of the authorization mode used.
kubectl auth can-i create deployments --namespace dev
Administrators can combine this with user impersonation to determine what action other users can perform.
kubectl auth can-i list secrets --namespace dev --as dave

kubectl auth can-i list pods --namespace target  --as system:serviceaccount:dev:default
Admission control
At this point, from kuber-apiserver's perspective it believes we are who we say we are and are permitted to continue. But with Kubernetes, other parts of the system have strong opinions about what should and should not be permitted to happen. This is where admission controllers enter the picture.
Admission controllers intercept the request to ensure that it matches the wider expectations and rules of the cluster. They are the last control before an object is persisted to the etcd. Admission controllers may be "validating", "mutating", or both. Mutating controllers may modify related objects to the requests they admit; validating controllers may not. They limit requests to create, delete, modify objects. They do not limit requests to read objects.
The way admission controllers work is similar to the way authenticators and authorizers work, but with one difference: unlike authenticator and authorizers chains, if a single admission controller fails, the entire request is rejected immediately and an error is returned to the end-user.
There are a ton of admission controllers and each is stored as a plugin in plugin/pkg/admission directory and is then compiled into main K8s binary. Some examples are
AlwaysPullImages
CertificateApproval
CertificateSigning
DefaultIngressClass
DefaultStorageClass
NamespaceAutoProvision
Dynamic Admission Controls
In addition to compiled-in admission plugins (which we saw above), admission plugins can be developed as extensions and run as webhooks configured at runtime. These webhooks are HTTP callbacks that receive admission requests and do something with them. You can define two types of admission webhooks, validating and mutating admission webhook. Mutating admission webhooks are invoked first, and can modify objects sent to the API server to enforce custom defaults. After all object modifications are complete, and after the incoming object is validated by the API server, validating admission webhooks are invoked and can reject requests to enforce custom policies.
etcd
By this point K8s has fully vetted our request and permitted it to forth by storing it in etcd. K8s uses etcd as storage backend to store all cluster data.
In our case (deploying 3 nginx replicas - in case you forgot about that 😉).
A create handler was created
Resource was decoded/deserialized
Auditing was done, admission controllers were run
If everything went well, api-server saves the resource to etcd by delegating to the storage provider.
Any create errors are caught and, finally, the storage provider performs a get call to ensure the object was actually created.
The HTTP response is constructed and sent back.
At this point, end-user will get deployment/nginx created message.
kubectl create deploy nginx --image=nginx --replicas=2
deployment.apps/nginx created
But, it just means that a deployment object is persisted to the storage. There are no nginx pods running yet.
Control loops
K8s makes use of the Control Loops or the Controllers to bring the current state closer to the desired state. A controller tracks at least one K8s resource type, these objects have spec field that represents the desired state. Controllers are run in parallel by the kube-controller-manager component.
In our case, deployment and replicaset controllers will be used.
Deployment
After a Deployment record is stored to etcd and initialized, it is made visible via kube-apiserver. When this new resource is available, it is detected by the Deployment controller, whose job it is to listen out for changes to Deployment records. In our case, the controller registers a specific callback for create events via an informer (An informer is a pattern that allows controllers to subscribe to storage events and easily list resources they're interested in. blog post).
This handler will be executed when our Deployment first becomes available and will start by adding the object to an internal work queue. By the time it gets around to processing our object, the controller will inspect our Deployment and realise that there are no ReplicaSet records associated with it. It does this by querying kube-apiserver with label selectors.
After realising none exist, it will begin a scaling process to start resolving state. It does this by rolling out (i.e. creating) a ReplicaSet resource(note: all the steps starting with auth, authz to persisting object in etcd would happen for ReplicaSet as well), assigning it a label selector, and giving it the revision number of 1. The ReplicaSet's PodSpec is copied from the Deployment's manifest, as well as other relevant metadata.
The status is then updated and it then re-enters the same reconciliation loop waiting for the deployment to match a desired, completed state. Since the Deployment controller is only concerned about creating ReplicaSets, this reconciliation stage needs to be continued by the next controller, the ReplicaSet controller.
ReplicaSet
Now we have a deployment object, a replicaset object but still no pods. This is where ReplicaSet controller comes in. It monitors the lifecycle of ReplicaSets and their dependent resources (Pods). Like most other controllers, it does this by triggering handlers on certain events(event we're interested in is creation).
When a ReplicaSet is created (courtesy of the Deployments controller) the RS controller inspects the state of the new ReplicaSet and realizes there is a skew between what exists and what is required. It then seeks to reconcile this state by bumping the number of pods that belong to the ReplicaSet.
Kubernetes enforces object hierarchies through Owner References. Not only does this ensure that child resources are garbage-collected once a resource managed by the controller is deleted (cascading deletion), it also provides an effective way for parent resources to not fight over their children. So, the pods will have owner ref to RS and RS would have ref to Deployment.
Scheduler
Now, we have a Deployment, a RS and three pods objects in etcd. Our pods, however, are stuck in Pending state because they haven't been scheduled to a node. Scheduler controller to rescue!
The scheduler runs as a standalone component and operates in the same way as other controllers. It filters pods that have an empty NodeName field in their PodSpec and attempts to find a suitable Node that the pod can reside on. The way the default scheduling algorithm works is the following:
filtering - finds the set of Nodes where it's feasible to schedule the Pod. For example, the
PodFitsResourcesfilter checks whether a candidate Node has enough available resource to meet a Pod's specific resource requests.scoring - the scheduler ranks the remaining nodes to choose the most suitable Pod placement. The scheduler assigns a score to each Node that survived filtering, basing this score on the active scoring rules. The highest ranked node is then selected for scheduling.
Once the algorithm finds a node, the scheduler sends a bind object with the pod and the node ref to the apiserver. API-server sets the NodeName to the one in the bind object and sets its PodScheduled status condition to True.
Custom Scheduler
Filtering and scoring behavior of the scheduler can be configured using
Scheduling Policies: allow you to configure Predicates for filtering and Priorities for scoring.
Scheduling Profiles: allow you to configure Plugins that implement different scheduling stages.
OR you can write your own custom scheduler and use it by specifying schedulerName field in podSpec.
kubelet
Okay, let's see what has been done so far: the HTTP request passed authentication, authorization, and admission control stages; a Deployment, ReplicaSet, and three Pod resources were persisted to etcd; and, finally, each Pod was scheduled to a suitable node. However, the state we are talking about exists purely in etcd. The next steps involve distributing this state across the worker nodes, which is the whole point of a distributed system like Kubernetes! The way this happens is through a component called the kubelet.
Kubelet runs on every node on the cluster and is responsible for managing the lifecycle of pods. This means it handles all of the translation logic between the abstraction of a "Pod" (which is really just a Kubernetes concept) and its building blocks, containers. It also handles all of the associated logic around mounting volumes, container logging, and many more important things.
Pod sync
Like a controller, kubelet periodically queries the apiserver for pods whose NodeName matches the name of the node kubelet is running on. Once it has that list, it detects changes by comparing against its own internal cache and begins to synchronise the state. Let's take a look at what that synchronization process looks like when the pod is being created(we are creating nginx pods, remember?):
Record pod worker start latency since kubelet first saw the pod.
Call generateAPIPodStatus to prepare an
v1.PodStatusfor the pod, which represents the state of a Pod's current Phase. The Phase of a Pod is a high-level summary of where the Pod is in its lifecycle. Examples includePending,Running,Succeeded,FailedandUnknown.Update the status of the pod in the status manager, which is tasked with asynchronously updating the etcd record via the apiserver.
Next, it is checked whether pod can be run. A series of softAdmitHandlers are checked, these include enforcing AppArmor profiles and [NO_NEW_PRIVS (github.com/kubernetes/kubernetes/blob/v1.23..) (pod-security-policies)[kubernetes.io/docs/concepts/policy/pod-secu... Pods denied at this stage will stay in the Pending state indefinitely.
Create Cgroups for the pod and apply resource parameters. This is to enable better Quality of Service (QoS) handling for pods.
Create a mirror pod if the pod is a static pod, and does not already have a mirror pod
Data directories are created for the pod. These include the pod directory (usually
/var/run/kubelet/pods/<podID>), its volumes directory (<podDir>/volumes) and its plugins directory (<podDir>/plugins).Wait for volumes to attach/mount defined in
Spec.Volumes. Depending on the type of volume being mounted, some pods will need to wait longer (e.g. cloud or NFS volumes).Fetch the pull secrets for the pod defined in
Spec.ImagePullSecrets.Call the container runtime's SyncPod callback, the container runtime then runs the container
CRI
Now, our containers (not pod anymore) are ready to be launched. The software that does this launching is called the Container Runtime (docker, rkt, containerd etc)
Since v1.5.0, the kubelet has been using a concept called CRI (Container Runtime Interface) for interacting with concrete container runtimes. The CRI is a plugin interface which enables the kubelet to use a wide variety of container runtimes, without having a need to recompile the cluster components. CRI is the main protocol for the communication between the kubelet and Container Runtime.
The Kubernetes Container Runtime Interface (CRI) defines the main gRPC protocol for the communication between the cluster components kubelet and container runtime.
During, Container Runtime(CR) syncPod call, kubectl makes following gRPCs to the underlying CR following the CRI
Compute sandbox and container changes.
Kill pod sandbox if necessary - when sandbox changes or containers in it are dead.
Create ephemeral containers - These are used to debug actual application containers.
Create init containers.
Create normal containers.
In Docker (container runtime) creating a sandbox involves creating a pause container. The pause container provides a way to create cgroups and various other linux namespaces (network, IPC, PID etc) and to share them among all the containers of the pod. That's why we can reach all the containers of a pod at localhost from one another. Pod networking is setup using a CNI plugin during sandbox creation.
Pod networking and CNI
Our Pod is now created: a pause container which hosts all of the namespaces to allow inter-pod communication and our nginx container. But how does networking work and how is it set up?
Kubelet delegates the task of networking setup to a CNI plugin. CNI stands for Container Network Interface and operates in a similar way to the Container Runtime Interface. CNI is an abstraction that allows different network providers to use different networking implementations for containers.
During, the pod sandbox creation kubelet calls the registered CNI plugin with the pod specific data (its name, network namespace etc). Once the plugin finishes its job, the pod should be able to reach other pods on the same host.
Inter-host Networking
By this time pods on same node can communicate with each other. But, what if two pods on different machines want to communicate.
There are several ways to accomplish this. For instance, AWS EKS does it using native VPC networking while solutions like flannel do it using overlay networking.
Note: Inter-host networking isn't configured with every pod creation. It's usually done during cluster creation.
Container startup
As we talked earlier, once the PodSandbox is created, kubelet will
Kill the sandbox if necessary
Create ephemeral containers - These are used to debug actual application containers.
Create init containers.
Create normal containers.
ephemeral, init and normal containers are created in the same way
Create Container via CRI.
podSandboxID,containerConfig,podSandboxConfigare passed to the CR.Container is then registered with cpu and memory manager. This allows containers in guaranteed QoS pods with integer CPU requests access to exclusive CPUs on the node.
The container is then started
If there are any post-start container lifecycle hooks, they are run
Done!
Is this it? I guess so.
After all this, we should have three nginx pods running in our cluster.
kubectl create deploy nginx --image=nginx --replicas=3
deployment.apps/nginx created

kubectl get deploy nginx --show-labels
NAME    READY   UP-TO-DATE   AVAILABLE   AGE   LABELS
nginx   3/3     3            3           80s   app=nginx

kubectl get pods -lapp=nginx
NAME                     READY   STATUS    RESTARTS   AGE
nginx-6799fc88d8-4qcft   1/1     Running   0          89s
nginx-6799fc88d8-dlngw   1/1     Running   0          89s
nginx-6799fc88d8-gntj5   1/1     Running   0          89s
Update: I'm publishing blogs as github issues now. You can find them here https://github.com/nakamorg/blogs/issues